Is Your Toddler’s Thumb Stuck? A Parent’s Guide to Pediatric Trigger Thumb

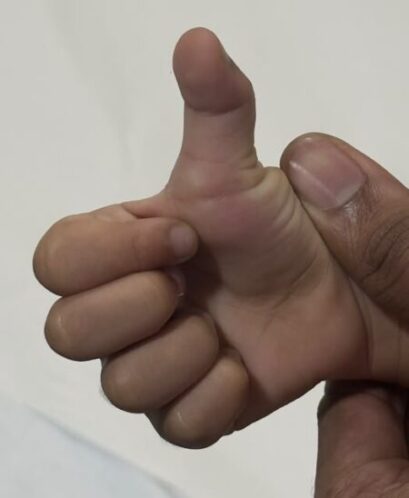
If your toddler cannot fully straighten their thumb, keeps it tucked tightly into their palm, or you hear a distinct “click” when they try to extend it, they may have pediatric trigger thumb.

While finding your child’s thumb locked can be alarming, this developmental condition is common, usually painless, and highly treatable.

What is Pediatric Trigger Thumb?

Pediatric trigger thumb is a developmental condition where a child’s thumb gets locked in a bent position. It typically appears between 1 and 3 years of age, and in about 25% of cases, it affects both thumbs.

  • The Cause: A small, harmless bump called a Notta’s nodule forms on the thumb’s flexor tendon.
  • The Problem: As the tendon moves, this small nodule gets caught on the tight fibrous sheath (the A1 pulley) at the base of the thumb, preventing the tendon from sliding smoothly.

4 Common Signs of Trigger Thumb in Toddlers

Parents often notice signs during daily activities like eating, dressing, or playing with toys:

  1. Locked Thumb: The top joint of the thumb is bent toward the palm and cannot straighten on its own.
  2. Clicking or Popping: A distinct snap or click sound when your child attempts to extend the thumb.
  3. Small Lump in Palm: A firm, pea-sized nodule felt at the base of the thumb in the palm.
  4. Assisted Straightening: Your child uses their opposite hand to manually push the bent thumb straight.

How Is Pediatric Trigger Thumb Treated?

A pediatric orthopedic specialist can quickly diagnose this condition with a brief physical exam—x-rays or complex imaging are rarely needed. Treatment depends on your child’s age and the severity of the flexed joint.

1. Non-Surgical Treatment (Under Age 2)

For infants and younger toddlers with mild or flexible cases, doctors usually recommend conservative management first:

  • Observation: Up to 30% to 60% of mild cases in younger children resolve naturally over time.
  • Stretching & Splinting: Gentle daily stretching exercises or wearing a custom nighttime splint helps keep the thumb in a functional, straight position.

2. Surgical Release (Over Age 2)

If the thumb remains locked past age two or conservative management does not help, an outpatient procedure called an A1 pulley release is the definitive fix:

  • The Procedure: Performed safely under general anesthesia, the surgeon makes a tiny incision to open the tight pulley tunnel so the tendon slides freely.
  • Recovery: The procedure takes only a few minutes, and your child goes home the same day. Most toddlers return to normal, unrestricted play within 1 to 2 weeks.

When to See a Doctor

If you notice your child’s thumb is bent, stiff, or clicking, schedule an evaluation with a pediatric specialist. Early assessment ensures you receive proper guidance on conservative care and helps your little one return to restriction-free play quickly.

Children Safety @ home during Holidays

School holidays are poised with challenges for parents/caregivers in looking after the children.  Due to school holiday, children are spending most of their time at home. Above all, the children are adventurous and certainly not have an understanding of the consequences of their activities.  So children are more susceptible to injuries. However, most of the injuries can be anticipated and avoidable. So it is essential to have a safe home environment to reduce the probability, possibility, occurrence, and brutality of injuries.

Causes of injury –

The most common causes of injury are falls, jammed fingers, poisoning, burns, and near-drowning.  In children aged one to two years, injuries at home are most common.  After two years of age the injury rate decreases.

The common situations interconnected to injuries include:

  • Poor visual contact between the play areas and work areas

  • Poor lighting, floor surface or tripping hazards

  • Lack of supervision when parents or caregivers are busy or distracted.

Prevention of injuries –

The most essential safety precaution is supervision. Especially, when children are on balconies should be supervised all the time.

In the living area, provide safe play space.

Make sure dangerous items (medicines, matches, or lighters) are inaccessible.

Mount barriers to stop entry to dangerous areas.

Use safety products like electrical outlet plugs, window stops, and furniture straps.

While cooking, children are kept away from the kitchen.

In the bathroom, always remain within arm’s reach of your baby

Never reverse your car, until you know all children are safe

For more information –

https://www.cdc.gov/parents/children/safety.html

https://kidshealth.org/en/parents/household-checklist.html

Prevent Infections in Children

Bacteria and viruses can spread from children to children simply through touch and through the air. Infections occur due to the spread of bacteria and viruses. So it is important to stop the spreading of bacteria and viruses.

To stop the spreading of bacteria and viruses, good hygiene practices are important. Good hygienic practices are washing hands, encouraging children to cough or sneeze into their elbow, and not sharing the cups, cutlery, or personal items.

WASHING HANDS –

Why?

When the bacteria and viruses come in contact with hands, it is easily transmitted on touch. Once the bacteria and virus are on hands, they can get inside the body on touching the eyes, nose, or mouth. So to prevent the spread of bacteria and viruses, washing hands is an important good hygienic practice.

When?

Washing your children’s hands and your hands are the best things to do to stop the spread of bacteria and viruses. Washing hands should be done before eating food, before feeding a child, before giving medications to a child, and before touching or holding a sick child. And also washing hands should be done after changing a nappy, after helping a child use the toilet, after wiping your child’s nose, after touching or holding a sick child, and after touching the pets or other animals.

How?

First, wet the hands

Apply soap or hand wash and rub for at least 20 seconds

Make sure to rub in between the fingers, under fingernails, around the thumb, bank of hands and wrists

Rinse the hand and dry

Others –

Follow other good hygienic practices like encouraging the child to cough or sneeze into their elbow and to use tissues instead of hankies.

Key points to remember –

It is important to hand wash regularly to prevent the spread of infection

Wash hands for at least 20 seconds

Follow other good hygienic practices

More information –

https://www.aboutkidshealth.ca/article?contentid=1981&language=english

https://kidshealth.org/en/parents/hand-washing.html

https://www.childrens.com/health-wellness/importance-of-hand-washing-for-kids-infographic

https://www.rch.org.au/kidsinfo/fact_sheets/Hand_Hygiene_why_is_it_so_important/

Plaster Cast Care Essentials in children at home

The plaster cast is given to your child to treat an injury or after surgery to provide rest to the limb. Therefore the role of a plaster cast is to keep the arm/leg in a certain position and to protect the operated area while it heals. The most important and essential part of orthopaedic home management is cast care. Caring for a child’s plaster cast properly at home is crucial to protect the injured limb, ensure proper bone healing, and prevent complications like skin infections or poor blood circulation.

Key Rules for Cast Care –

  • Keep It Dry: Plaster casts usually take 24 to 48 hours to dry completely. Water will weaken or break down the plaster. During baths or showers, double-wrap the cast in a waterproof plastic bag sealed with tape or rubber bands. Never submerge the cast in water.
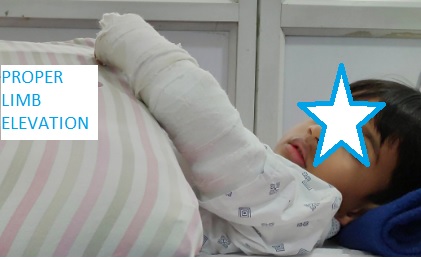
  • Reduce Swelling: Keep the cast elevated above the level of the child’s heart whenever they are sitting or lying down using pillows.
  • Encourage Movement: Prompt your child to wiggle their fingers or toes frequently throughout the day to boost blood circulation and keep swelling down.
  • Relieve Itching Safely: Itching under the cast is very common. Use a hairdryer set to the cool setting at the openings of the cast.
    • Never insert objects (like pencils, rulers, or knitting needles) inside the cast, as they can tear the skin or cause infection.
    • Avoid powders, lotions, or oils under or around the edges of the cast.
  • Decorating: Decorating the cast with markers or ink pens is fine, but do not paint or apply oil-based materials, as this clogs the pores of the plaster and prevents air from reaching the skin.

Daily Checks & Warning Signs –

Check the skin around the edges of the cast every day for redness, irritation, or sores.

Contact your healthcare provider or visit an emergency clinic immediately if you notice any of the following–

Burning or raw sores developing around the cast edges.

Circulation & Nerve Problems:

Severe pain that does not improve with elevated positioning or recommended pain relief.

Fingers or toes turning pale, blue, cold, or unusually hot to the touch.

Numbness, tingling, or a “pins and needles” feeling in the digits.

The child is unable to move their fingers or toes.

Cast Damage:

The cast breaks, cracks, softens, or becomes wet.

The cast feels too tight or becomes noticeably loose and slips.

Signs of Infection:

Bad, foul-smelling odors coming from inside the cast.

Unexplained fever or chills

Key points to remember

Keep the plaster cast clean and dry.

Elevate the limb above the heart level.

Encourage the child to move the finger and toes.

More information

https://www.mayoclinic.org/healthy-lifestyle/childrens-health/in-depth/cast-care/art-20047159

https://www.texaschildrens.org/sites/default/files/Cast-Care.pdf

https://kidshealth.org/en/parents/casts.html

An Unpleasant Child and Unsettling Parents – ? Transient Synovitis of the Hip(Irritable Hip)

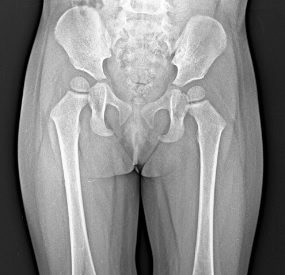
While transient synovitis (irritable hip) can be distressing to witness as a parent, it is a self-limiting condition that typically resolves without long-term complications.

Understanding Transient Synovitis

  • Cause & Onset: It often follows a recent viral illness (such as a cold, throat infection, or stomach flu). The body’s immune response causes temporary inflammation and fluid buildup inside the hip joint capsule.
  • Common Age Range: Most frequently seen in children aged 3 to 10 years, with a higher incidence in boys.
  • Key Symptoms: Sudden onset of limping, difficulty crawling or standing, or pain referred to the groin, front of the thigh, or knee. Children typically remain “non-toxic” (well-appearing overall, without severe systemic illness).

Home Care & Recovery Management

  1. Rest & Activity Restriction:
    • Rest is the primary treatment. Keep your child off their feet as much as possible until pain improves.
    • Avoid high-impact activities, running, jumping, sports, or rough play for at least 1–2 weeks, as returning to strenuous activity too quickly can trigger a temporary relapse.
  2. Pain Management:
    • Non-steroidal anti-inflammatory drugs (NSAIDs) like ibuprofen or mild analgesics like acetaminophen help relieve joint inflammation and ease movement discomfort. Always consult a pediatrician for exact dosages based on your child’s weight.
  3. Comfort Measures:
    • Gentle heat from a warm compress applied to the hip area or a warm bath can help relax surrounding muscle spasms.

Red Flag Symptoms – Visit Your Pediatric Orthopedic Surgeon Immediately

Because transient synovitis shares symptoms with more critical conditions—such as septic arthritis (a severe bacterial joint infection requiring urgent drainage and antibiotics) or Legg-Calvé-Perthes disease—seek immediate medical attention if you notice:

  • Fever: High-grade or persistent fever.
  • Severe Mobility Refusal: The child completely refuses to bear weight, move the leg, or allows no touching or movement of the limb even while resting.
  • Unrelieved Pain: Pain at rest or severe pain that does not respond to recommended doses of analgesics/NSAIDs.
  • Lack of Progress: No noticeable improvement after 3 days, or symptoms that have not completely resolved within 2 weeks.
  • Systemic Illness: The child appears visibly unwell, lethargic, or toxic.

Key points to settle the parent’s concern

Transient synovitis of the hip is the mild condition and will get better on its own. However, a vigilant watch is needed to avoid the unwanted.

Know more –

http://bengalurukidsortho.in/health-info/transient-synovitis-of-the-hip-or-irritable-

hip/https://www.rch.org.au/kidsinfo/fact_sheets/Transient_synovitis/

https://posna.org/Physician-Education/Study-Guide/Transient-Synovitis-of-the-Hip

Club foot is a curable condition – Casting and cast care

Introduction –

Club foot is a treatable congenital foot deformity. The cause of the club foot is unknown. Club foot treatment should be started as early as possible after the delivery. The standard accepted treatment protocol is the Ponseti method of club foot manipulation and casting. Club foot manipulation and casting are painless procedures.

Cast application won’t deter the normal development of the baby and immunization should be continued as per the schedule.

The child’s foot is manipulated and placed in a cast to correct the inwardly- turned deformity of the foot. The cast extends from the toes to mid-thigh i.e. long leg cast. The foot is placed in the manipulated position for 4 to 7 days. So that the muscles and ligaments will stretch enough to help further correction is possible in the next cast. After the cast removal, the same process of gentle manipulation and casting is done in a much-corrected position. Casting is repeated for 5-6 times approximately depending on the age of baby and rigidity of the deformity. Just before the complete correction, the heel cord is cut in about 75-85% of the babies. This is done before the application of the last or last but two casts. The heel cord reattaches within 2-3 weeks and without any weakness.

Care about for each cast application –

First 24 hours after each cast application, the baby will be little fussy/ restless. This is usually due to discomfort and not due to pain. The baby should be comfortable after 24 hours.

The cast should be placed on the soft surface for 24 hours, as the cast takes about 24 hours to dry completely.  When the baby is on his/her back, place a rolled towel to elevate the limb with heel extends beyond the towel roll. This prevents the pressure sore on the heel.

Check the circulation in the foot every hour for the first 6-8 hours after application of the cast. After 8 hours, circulation is checked 4 times a day. Circulation is checked by pinching the toes, and then watches the return of color in the toes. Toes will turn white while pinching and then quickly return pink if the blood flow to the foot is good. If the toes are white, cold and don’t turn from white to pink on pinching, it indicates foot circulation is hampered. This may be due to tight cast. If this occurs, call your doctor immediately.

Top of the toes should be exposed. If toes are not visible, then it means the cast has sipped and correct reduction is not maintained. If this happens, call your doctor immediately.

Use disposable diapers always and frequent change of diaper is needed to prevent cast soiling. Apply the diaper above the top end of the cast, so that it prevents urine from getting inside the cast.

Observe at the skin condition at the edges of the cast.

Keep the cast clean and dry. The cast may be wiped with a slightly dampened cloth if it gets soiled.

Contact immediately –

When

                Toes are pale or swollen

                The cast is slipped and toes are sunken inside the cast

                Any foul smelling odor is coming from the cast

                Skin is red, sore or irritated at the edges of the cast

                Any drainage on the cast

                A child has an increased temperature of 101.3 degrees F or higher without a reason

Instruction before next cast application –

A new cast is applied every 4 to 7 days.

The cast can be removed at the clinic or home.

If removal is planned at home, then put the baby in a tub containing warm water and make sure that is inside the water for approximately 10-15 minutes. Then unwind the plaster and remove the cast. However, do not soak or remove the cast the day before the appointment.

Give the baby shower before every cast application.

Feed the baby and burp the baby before manipulation and cast application.

Bracing after the last cast application –

Club foot correction is maintained by a special foot abduction brace. Foot abduction brace includes shoes attached to a metal bar. Strict adherence to bracing protocol is important to prevent relapse.  A brace should be worn 23 hours a day for 3months, then bracing duration is reduced tonight and during naps by 1 year of age. By 1 year of age, the baby will start to walk. Walking on barefoot maintains the correction and helps in foot development. Bracing is continued at night and naps for an additional 3 to 4 years. The baby may be uncomfortable during the first and second night of brace wear. Usually, the baby adapts and tolerates the brace well after the second night of brace use.

Follow up visits are scheduled at one week, one month and three-monthly, till one year of age. The second-year, follow up visits are scheduled at six-monthly intervals.  Always bring the child’s brace at every visit. Thereafter yearly till skeletal maturity. Relapse will almost always occur if the shoes with the metal bare are not worn.

Know more –

http://bengalurukidsortho.in/health-info/congenital-talipes-equinovarus-ctev-or-club-foot/

https://orthoinfo.aaos.org/en/diseases–conditions/clubfoot/

http://orthokids.org/Condition/Clubfoot

http://www.ponseti.info/casting-care-instructions.html

https://kidshealth.org/en/parents/ponseti-casting.html

Baby Walker – A Boon or a Bane ?

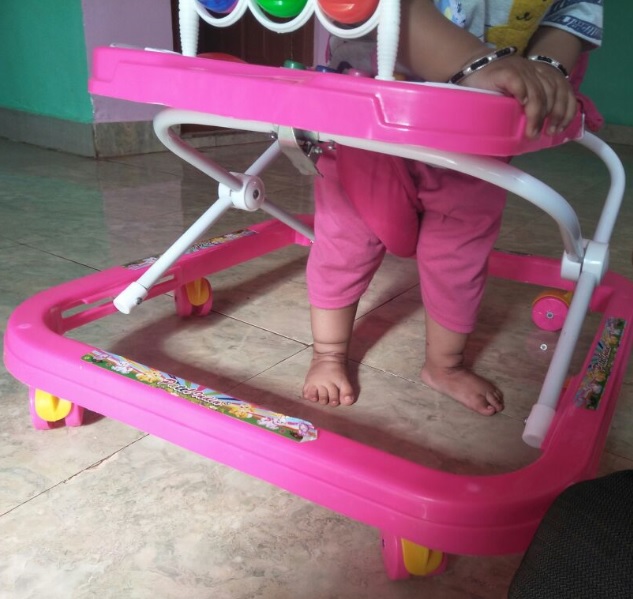
A baby walker consists of a wheeled base supporting a rigid frame, a fabric seat, and a plastic tray. Parents often use these devices for infants between 5 and 15 months of age to support mobility while feet touch the floor. However, medical experts urge caution when considering a baby walker for your child.

Why Parents Use a Baby Walker

Caregivers often choose a baby walker for several common reasons:

  • Entertainment: Keeping the infant occupied and entertained.
  • Mobility: Attempting to encourage movement and early walking.
  • Convenience: Holding the infant during feeding or providing quick exercise.
  • Perceived Safety: Operating under the mistaken belief that a walker keeps babies safe.

Common Baby Walker Injuries

Despite their popularity, mobile baby walkers pose severe safety risks. A baby walker allows a child to move faster than 3 feet per second, which makes adult supervision insufficient to prevent sudden accidents.

Frequent injuries include:

  • Stair Falls: Tipping or rolling down stairs causes severe head injuries and fractures.
  • Reaching Hazards: Increased height allows infants to reach hot liquids, electrical cords, and toxic household chemicals.
  • Tipping Over: Walkers easily trip over uneven surfaces, doorway thresholds, or small floor rugs.

How a Baby Walker Delays Motor Development

A baby walker does not help infants learn to walk faster. In fact, these devices actively delay physical milestones.

Walkers create a false sense of independent movement, which reduces a child’s natural motivation to crawl or pull themselves up. Additionally, a baby walker strengthens lower leg muscles incorrectly without developing the core balance and trunk stability required for natural walking.

AAP Guidance & Recommendations

Health organizations strongly advise against mobile infant walkers:

  • Follow AAP Advice: The American Academy of Pediatrics (AAP) recommends a full ban on manufacturing and selling mobile baby walkers with wheels.
  • Avoid Mobile Walkers: Do not use wheeled walkers at home, and advise babysitters, daycare centers, and grandparents to skip them.
  • Choose Safer Alternatives: Use stationary activity centers without wheels, or opt for push toys once your child can pull themselves up to stand.
  • Spread Parent Education: Share safety awareness with other caregivers regarding the risks of mobile walkers.

Conclusion

A mobile baby walker offers no developmental benefits and introduces major safety hazards. To support your child’s physical growth safely, skip the wheeled walker and focus on supervised floor play and stationary activity stations.

References –

https://pediatrics.aappublications.org/content/108/3/790

https://www.mayoclinic.org/healthy-lifestyle/infant-and-toddler-health/expert-answers/baby-walkers/faq-20058263

https://www.healthychildren.org/English/safety-prevention/at-home/Pages/Baby-Walkers-A-Dangerous-Choice.aspx

Bowed Legs in Children: Is It Normal?

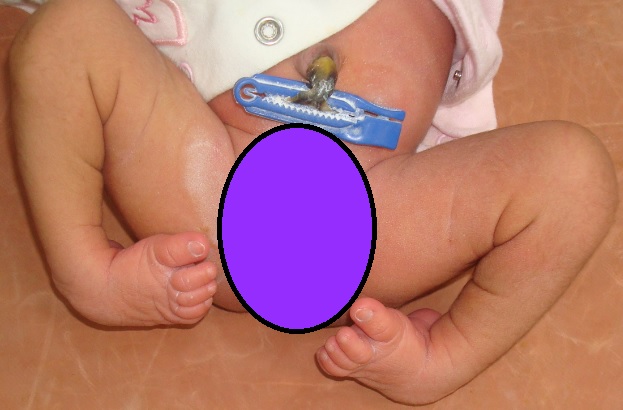
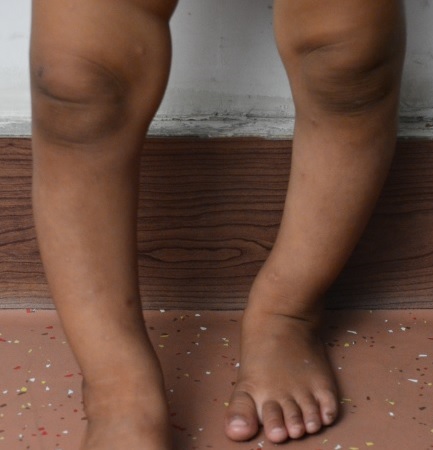
In children with bowed legs (genu varum), the knees curve outward and do not touch when the feet are placed together. Most infants are born with bowed legs, but parents usually notice the curve when their child starts walking around 12 months. Fortunately, these legs typically straighten on their own between 18 and 24 months.

This temporary, normal curve in infants is known as physiological bow legs.

Causes of Physiological Bow Legs

Bowed legs in newborns develop naturally due to the folded, cramped position of the fetus inside the uterus. The outward curve may appear to increase slightly until 18 months, after which the child’s legs naturally straighten during growth.

Treatment for Physiological Bow Legs

Because physiological bow legs correct naturally over time, doctors do not recommend special shoes, braces, or physical exercises.

If you are concerned about your child’s leg shape, track their progress visually:

  1. Take a standing photo of your child every six months.
  2. Ensure your child stands facing directly forward with their knees clearly visible.

When to See a Pediatric Orthopaedic Surgeon (Red Flag Signs)

While most cases resolve independently, severe or persistent bowing requires a professional medical evaluation. Consult a pediatric orthopaedic surgeon if you observe any of these red flag signs:

  • Severe Bowing: The leg curvature appears unusually steep or is worsening.
  • Persistence Past Age 3: Bowed legs remain noticeable after your child turns three.
  • One-Sided Bowing: Only one leg curves outward, while the other appears straight.
  • Pain or Limping: Your child complains of knee, hip, or leg pain, or walks with a limp.
  • Short Stature: Your child is unusually short for their age group.

What Happens During a Pediatric Orthopaedic Examination?

During an examination, a pediatric orthopaedic surgeon will evaluate your child through several steps:

  1. Medical History: Reviewing developmental milestones, daily nutrition habits, and any family history of skeletal conditions.
  2. Gait & Alignment Observation: Watching your child walk to detect any abnormal knee movement or lateral thrust.
  3. Physical Exam: Checking joint flexibility, ligament laxity, and limb rotation.

For most young toddlers, a thorough physical exam provides all the necessary answers. However, if red flag signs are present, the doctor may order standing X-rays (radiographs) or blood tests to check for underlying conditions like rickets or Blount’s disease.

Conclusion

Bowed legs in infants under 18 months are completely normal and typically straighten by 24 months. However, bowed legs that persist after age three are considered pathological and require evaluation and treatment by a specialist.

Know more –

http://orthokids.org/Condition/Bowed-Legs-Knock-Knees

https://www.rch.org.au/uploadedFiles/Main/Content/ortho/factsheets/BOWLEGS.pdf

https://kidshealth.org/en/parents/bow-legs.html

https://www.ucsfbenioffchildrens.org/conditions/bow_legs_and_knock_knees/

https://www.columbiadoctors.org/condition/bowlegs-knock-knees-pediatric

Backpack Safety for Kids: Tips to Prevent Back Pain and Injuries

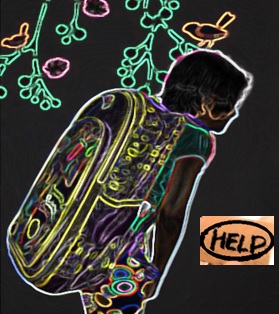
Backpacks are a practical and popular way for children and adolescents to carry school supplies. When worn correctly, backpacks effectively distribute weight across some of the body’s strongest muscles. However, carrying a backpack that is too heavy or worn improperly can lead to severe posture problems, shoulder strain, and chronic back pain in children.

Health Problems Caused by Heavy Backpacks

Carrying an overloaded or poorly fitted backpack can affect a child’s growing spine and posture in several ways:

  • Spinal Compression & Posture Issues: Placing a heavy pack on the shoulders pulls a child backward. To compensate, children often lean forward at the hips or arch their backs unnaturally, compressing the spine and causing neck, shoulder, and back pain.
  • Nerve Compression & Poor Circulation: Narrow or tight straps can dig deeply into the shoulders, interfering with circulation and pressing on nerves. This often leads to tingling, numbness, or weakness in the arms and hands.
  • Increased Risk of Falls: Oversized or bulky packs make it harder for children to maintain balance. Kids can easily trip, lose balance, or accidentally strike others when turning in tight spaces.

How to Choose a Safe Backpack for Your Child

Selecting the right backpack is the first step in protecting your child’s spine. Look for these essential features when shopping:

  • Proper Sizing: The backpack should match your child’s body size. An ideal pack is never wider than the child’s torso and should not hang more than 2 inches below the waistline.
  • Lightweight Material: Choose lightweight fabrics like nylon or canvas. Avoid heavy materials like leather, which add unnecessary weight before supplies are even packed.
  • Wide, Padded Shoulder Straps: Thick, padded straps distribute weight evenly across the shoulders without digging into the skin.
  • Padded Back Support: A padded back panel increases comfort and protects children from sharp edges like rulers, pencils, or hardbook corners inside the bag.
  • Multiple Compartments & Compression Straps: Extra pockets and side straps help distribute the load evenly throughout the bag and keep items secure.
  • Waist or Chest Straps: Using a waist strap transfers some of the load to the pelvis, holding the pack close to the body and reducing strain on the back.

Safe and Sensible Backpack Usage Tips

Buying the right bag is only half the battle—how your child uses it matters just as much. Teach your child these safe habits:

  1. Pack Light: A child’s loaded backpack should never weigh more than 10% to 15% of their total body weight.
  2. Use Both Straps: Always wear both shoulder straps rather than slinging the bag over one shoulder. Adjust the straps so the pack fits snugly against the back.
  3. Organize Smartly: Place the heaviest books and items low and closest to the center of the child’s back to keep the center of gravity stable.
  4. Carry Only Necessities: Encourage your child to leave unnecessary items at home or in their school locker.
  5. Lift with the Knees: When picking up a heavy backpack, children should bend at the knees rather than bending over at the waist.
  6. Strengthen Back Muscles: Encourage regular physical activity and back-strengthening exercises to build the core and back muscles needed to support daily school loads.

Conclusion

Backpack safety plays a critical role in preserving your child’s spinal health and posture. By picking a lightweight, properly fitted backpack and teaching smart packing habits, you can protect your child from unnecessary back pain and injury throughout the school year.

References

https://www.nsc.org/home-safety/safety-topics/child-safety/backpacks https://orthoinfo.aaos.org/en/staying-healthy/backpack-safety/ https://www.safety.com/backpack-safety https://kidshealth.org/en/parents/backpack.html?WT.ac=ctg

Can Improper Swaddling Increase the Risk of DDH?

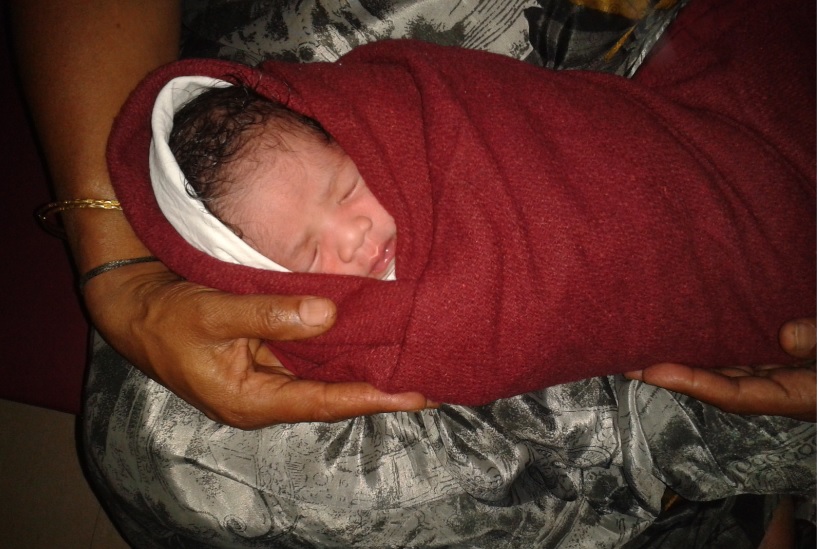
Wrapping or swaddling a newborn helps babies feel secure and comfortable, often easing them to sleep and establishing regular sleep routines. However, improper swaddling—such as wrapping a baby tightly with their legs straight down—can hinder normal hip joint development. In fact, tight swaddling significantly increases the risk of Developmental Dysplasia of the Hip (DDH).

The Link Between Swaddling and Hip Dysplasia

In the womb, a baby’s hips naturally rest in a bent, outward position. This position supports normal hip socket development. Although many newborns have loose hip ligaments that tighten naturally during the first few months, tight swaddling forces the legs together and straight. This unnatural posture can pull the hip joint out of its socket, causing instability or dislocation.

Medical research strongly supports hip-healthy swaddling practices:

  • Increased DDH Risk: A systematic review by Van Sleuwen et al. showed that hip dysplasia is far more prevalent when an infant’s legs are bound tightly without freedom of movement.
  • Impact of Awareness: Yamamuro et al. observed a dramatic drop in DDH incidence—from 1.5–3.5% down to 0.2%—after national public health programs eliminated tight, straight-leg swaddling.
  • Cultural Evidence: Cultures that carry infants in a wide-straddle or jockey position report remarkably low rates of hip dislocation compared to communities that wrap infants tightly with legs extended.

Because hip joints grow rapidly after birth, practicing safe swaddling techniques is critical during the first three months of life.

Safe Swaddling Guidelines for Healthy Hips

You can use traditional wrapping techniques like the diamond method, the square method, or a swaddle pouch, provided the lower body remains loose. Always ensure your baby has enough room to flex and kick their legs freely.

Official Medical Guidelines

The International Hip Dysplasia Institute and the Pediatric Orthopaedic Society of North America (POSNA) issue the following joint recommendation:

“Infant hips should be positioned in slight flexion and abduction during swaddling. The knees should also be maintained in slight flexion. Additional free movement in the direction of hip flexion and abduction may have some benefit. Avoidance of forced or sustained passive hip extension and adduction in the first few months of life is essential for proper hip development.”

Conclusion

Swaddling can comfort your infant, but keeping their hips safe requires proper technique. When swaddling your baby, always leave enough room for their legs to bend up and out naturally. Giving your newborn freedom of movement protects their hip joints and supports healthy physical development.

Know more –

http://bengalurukidsortho.in/health-info/developmental-dysplasia-of-hip/

https://www.rch.org.au/uploadedFiles/Main/Content/kidsinfo/safe-wrapping-for-hip-dysplasia.pdf

https://www.aaos.org/uploadedFiles/PreProduction/About/Opinion_Statements/position/1186%20Swaddling%20and%20Developmental%20Hip%20Dysplasia(1).pdf